
How to Auto Generate Subtitles in DaVinci Resolve (Free & Studio)
Want DaVinci Resolve auto subtitles without typing every line? DaVinci Resolve Studio includes built-in speech-to-text subtitle generation. If you use DaVinci Resolve Free, generate an SRT file with an external transcription tool, then import it into your project. Both editions let you edit subtitle text, adjust timing, style captions, and export captioned videos.
This guide explains how to add subtitles in DaVinci Resolve using either workflow, align imported SRT files, and prepare translated subtitles for multilingual videos. The free-version method avoids a Studio purchase; external transcription services may have their own usage limits or paid plans.
Quick Answer: Can You Auto Generate Subtitles in DaVinci Resolve Free?
Yes, with an external subtitle generator. DaVinci Resolve Free does not include Studio’s native AI subtitle generation. To add automatic subtitles without purchasing Studio:
- 1. Export your video’s audio from DaVinci Resolve.
- 2. Generate and review subtitles with an external tool such as Taption.
- 3. Download the subtitles as an SRT file.
- 4. Import the SRT into Resolve and align it with your video.
External tools may offer a free trial; longer projects may require payment. Jump to the Taption workflow or the SRT import and sync steps for details.
DaVinci Resolve Free vs. Studio: Subtitle Features Compared
| Capability | Resolve Free | Resolve Studio | Taption + Resolve |
|---|---|---|---|
| AI subtitle generation | External tool | Built-in | Taption |
| SRT import | Yes | Yes | Yes |
| Subtitle translation | External tool | External tool | Taption |
| Personal AI Dictionary | No native transcription | No equivalent native dictionary | Yes |
| Subtitle styling in Resolve | Yes | Yes | Yes, after import |
| Animated word highlighting | Manual workflows | Built-in AI (Studio 20+) | With Studio 21 word timing |
Version note: This guide covers DaVinci Resolve 21. Some menu locations and features may differ in earlier versions. Instructions are based on Blackmagic Design’s official documentation.
Method 1: Auto Generate Subtitles in DaVinci Resolve Studio
Studio’s automatic subtitle generation was introduced in 18.5 and remains available in Resolve 21. For a project you are already editing in Studio, this keeps transcription and caption review in the same application.
- 1. Prepare the timeline: Finish structural edits first. Confirm that the intended dialogue is audible; mute unwanted overlapping dialogue tracks before analysis. Clear In and Out marks for the entire timeline, or set them deliberately for a selected range. Restore any muted tracks before final delivery.
- 2. Open the subtitle generator: On the Edit page, choose Timeline > AI Tools > Create Subtitles from Audio. Older versions may list Create Subtitles from Audio directly under Timeline.
- 3. Choose language and layout: Select the spoken language or Auto, then choose the caption preset, maximum characters per line, single or double lines, and the gap between subtitles. Use your delivery specification when one is supplied; otherwise preview a short section to choose readable line lengths.
- 4. Generate and proofread: Click Create. Resolve writes captions to a subtitle track. Review names, punctuation, omitted words, and cue boundaries against playback. Processing time depends on the media and hardware; automatic output still needs review.
Keep a copy of existing subtitles before regenerating: Blackmagic’s manual says generation uses the highest subtitle track when several are present. In Resolve 21, the subtitle Inspector also supports Find and Replace, including Replace All, for recurring corrections.
Method 2: Generate Subtitles in DaVinci Resolve Free with an SRT File
For DaVinci Resolve automatic subtitles in the free version, create the timed captions outside Resolve and import them as SRT. Taption can help with segmentation, terminology corrections, and multilingual review before you return to your edit.
Step 1: Export the audio or video you actually edited
From the Deliver page, export a dialogue audio file such as WAV, or a small H.264 video for visual proofreading. Use the same final edit, playback speed, and range you will caption. Keep leading silence and note the timeline position where the export begins. Export duration varies with the project and your computer.
Step 2: Automatically generate and refine subtitles with Taption
Upload that file to Taption’s AI subtitle generator and choose the source language. Review the generated captions before exporting:
- Refine line breaks: Set a preferred caption length and use automatic segmentation to split at natural language boundaries. Check that names and closely related phrases stay together.
- Correct recurring mistakes: Use Replace All to standardize repeated errors. Add specialist terms to your Personal AI Dictionary to help improve recognition in future uploads; it cannot guarantee error-free transcription.
- Adjust timing: Use word-level timestamps, timeline editing, and synchronized playback to check when each segment appears and disappears. Listen around pauses and speaker changes.
- Prepare other languages: Review the source text first, then translate and check terminology and line breaks for each audience. Export a separate SRT for each language.
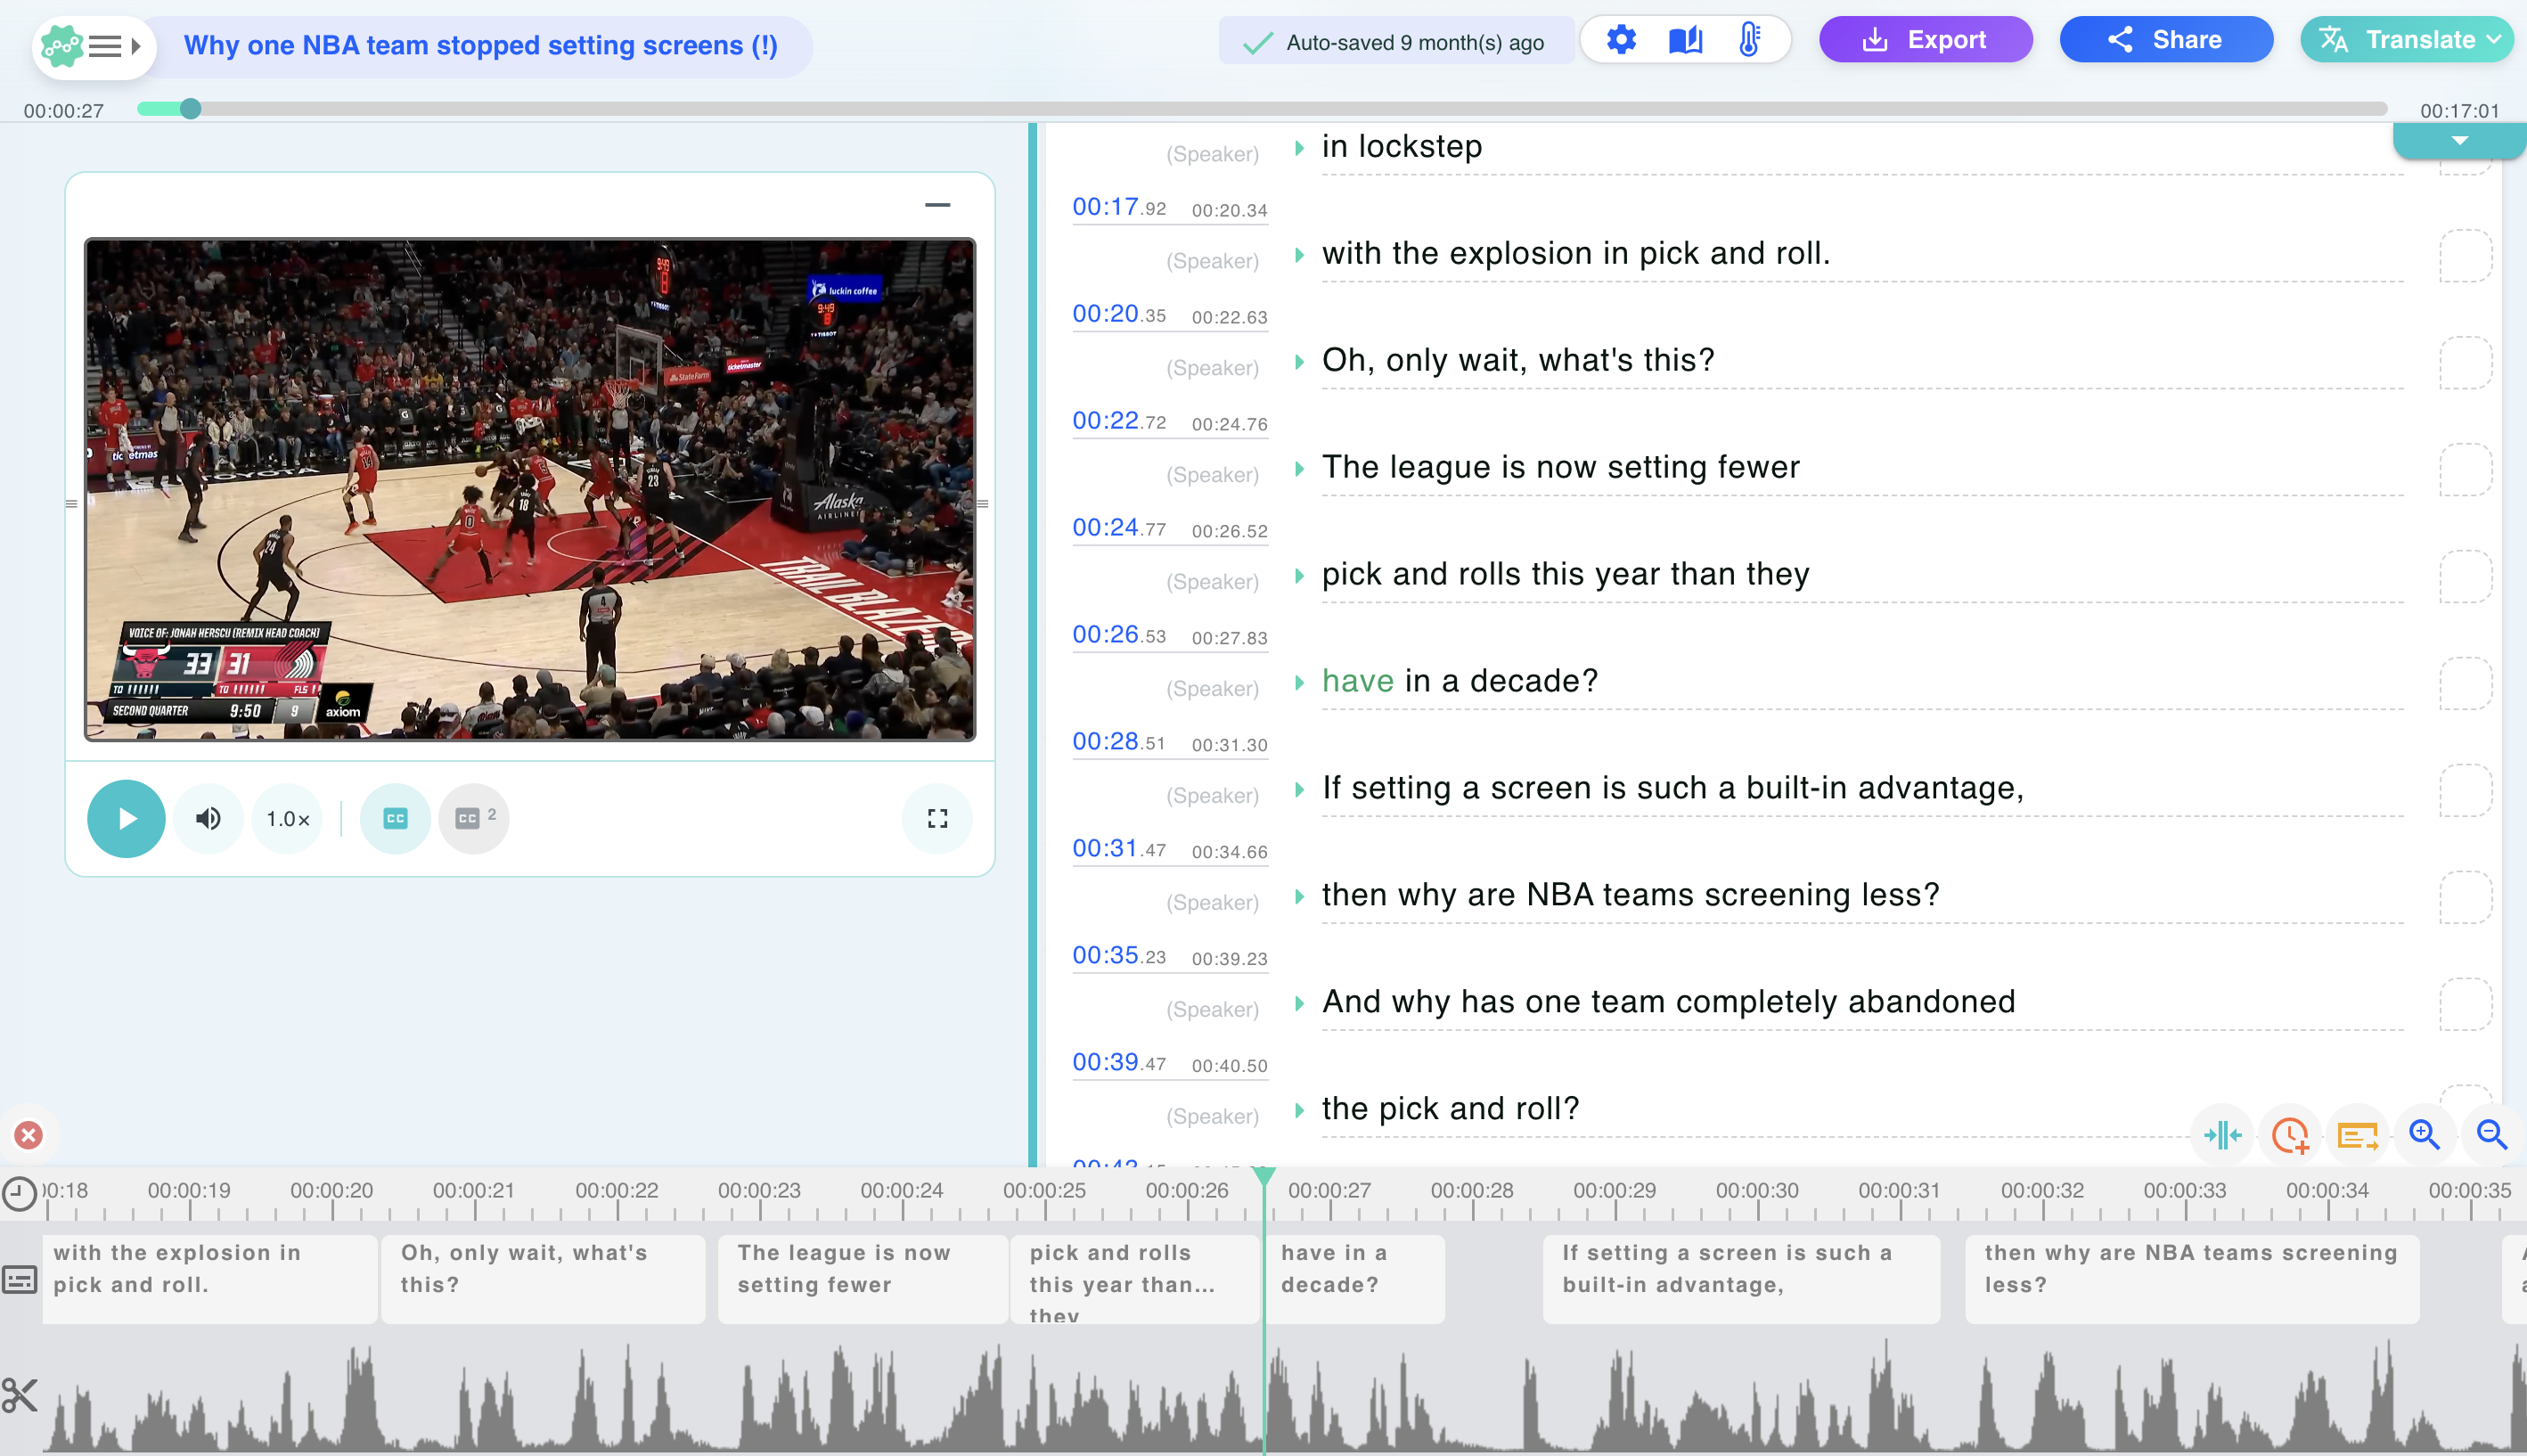
Taption’s English editor: review timestamped captions beside the video preview, and use the subtitle timeline and audio waveform below to refine segmentation and timing before exporting an SRT.
Step 3: Export a reviewed SRT and return to Resolve
Choose SRT in Taption’s export options, then import it using the steps below. SRT carries cue text and timing; set final typography in Resolve. No Resolve plugin is needed for this import workflow. If you already have a corrected script, you can also automatically sync a transcript to video before exporting an SRT.
Generate Subtitles for DaVinci Resolve Without Studio
Create, edit, and export a synchronized SRT with Taption. Start with the free upload trial for a clip of up to five minutes (200 MB maximum), then continue in the editor to refine your captions. Longer projects may require a paid plan.
Try Taption for Free
How to Import and Sync SRT Subtitles
Before importing, check whether the SRT timestamps match your timeline’s timecode or start at zero relative to an exported audio or video file. Use timecode insertion for matching timestamps; use manual placement for file-relative timing.
Tip: Import subtitles using matching timecode
If your SRT timestamps match your Resolve timeline’s timecode, import the file into the Media Pool, right-click it, and choose Insert Selected Subtitles to Timeline Using Timecode. Resolve places the individual captions at their matching timeline positions. Preview the first and last cues to confirm synchronization. This option is documented in the Resolve 21 reference manual, Chapter 59.
If your SRT uses timestamps relative to an exported audio or video file, follow the drag-and-align steps below. This matters when the timeline starts at 01:00:00:00 or the export begins partway through the edit.
Import and align subtitles from an exported file
- 1. Import into the Media Pool: On the Edit page, right-click the Media Pool background or a bin and choose Import Subtitle, then select the SRT. You can also drag a compatible SRT from your computer into the Media Pool.
- 2. Add it to the timeline: Drag the imported subtitle clip from the Media Pool into the subtitle area above the video tracks. If needed, right-click the track header area and choose Add Subtitle Track. Importing into the Media Pool alone does not display captions.
- 3. Check the first spoken cue: Locate the first caption and its matching dialogue. If there is a consistent offset, select the imported cues together and move them by that offset, preserving their spacing. Unlock the subtitle track first if necessary.
- 4. Check the middle and end: Play several cues across the edit. A constant offset calls for repositioning; increasing drift suggests different source media, speed changes, or edits made after transcription. Regenerate from the matching edit when necessary.
Alignment example: If the exported media begins at timeline 01:00:00:00 and the first SRT cue starts two seconds into that file, the cue belongs at 01:00:02:00. If you exported a later range, use that range’s start instead. Keep the project’s established start timecode; move the captions to match it.
How to Edit and Style Subtitles in DaVinci Resolve
Select a subtitle clip and open the Inspector. Edit its text and timing in the Caption tab. Use the Track controls for a shared appearance. For an individual styling override in Resolve 21, enable Customize Caption in the Caption tab, then adjust that caption’s style. See Chapter 59: Subtitles and Closed Captioning for track styling and caption overrides.
- Font and size: Choose a readable font with every character your language needs. Check the finished video at its intended viewing size. A font size that suits a landscape interview may be wrong for a vertical phone video.
- Contrast and position: Adjust outline, shadow, or background, then inspect bright and dark shots. Keep captions clear of faces, lower thirds, and the destination platform’s controls.
- Line breaks and reading speed: Break at sensible phrase boundaries and give viewers time to read. Figures such as 37–42 characters per line, 17 characters per second, or 48–72-point type are context-dependent starting points, not universal standards. Follow the client’s language and platform requirements.
Accessibility check: Speech subtitles alone do not establish compliance. Captions should also identify speakers when needed and convey meaningful non-speech audio, such as a doorbell or off-screen laughter. Review those details alongside synchronization and readability. See W3C’s explanation of prerecorded captions.
How to Translate DaVinci Resolve Subtitles into Other Languages
Transcription captures speech in its original language; translation creates text in another language. The Blackmagic documentation reviewed for this guide does not describe a built-in subtitle translation workflow. You can use Taption to translate subtitles into 50+ languages, including Traditional Chinese, Simplified Chinese, Japanese, and Korean, then bring the reviewed text into Resolve.
- Correct the source: Fix names, numbers, and technical terms before translating so errors do not carry into every language.
- Review each translation: Check meaning, terminology, punctuation, and line breaks with someone who understands the target language. Translation length may require different segmentation or cue durations.
- Export and label each file: Use names such as
interview_en.srt,interview_ja.srt, andinterview_zh-Hant.srt. - Import into separate tracks: Create a subtitle track for each language and align it to the same exported media reference. Enable the track you want to preview; locking a track prevents editing and is not a visibility control. Select the intended language again when exporting.
Subtitle Tracks vs. Text+ and AI Animated Subtitles
Subtitle tracks are useful for editable captions and SRT delivery. Text+ offers custom Fusion typography and motion, but text placed in a title is not automatically a caption in an exported SRT.
Studio 20 introduced AI Animated Subtitles, including word highlighting on subtitle tracks. Drag an Animated template from the Titles library onto the subtitle track header and adjust its parameters in the Inspector. You do not need to rebuild every caption as a separate Text+ title just to use these presets. See Blackmagic’s Resolve 20 New Features Guide, page 27.
Studio 21 improves imported-caption workflows: Resolve can analyze word timing for manually entered or imported captions. Use Update Word Timings in a selected caption’s Inspector, or right-click the subtitle track header and choose Synchronize Word Timings. This can prepare imported captions for spoken-word highlighting; check the result against the matching audio. These controls are documented in the Resolve 21 New Features Guide, pages 78–79.
Use Text+ when you need a custom layout or motion beyond the subtitle templates. Resolve Free can use manual title animation or compatible third-party workflows. An ordinary SRT does not store word-level animation or Fusion styling, so keep the subtitle file for caption delivery and render the animated appearance into video when needed.
How to Export Subtitles: Burned-In Video or SRT
On the Deliver page, open the Video panel in Render Settings, find Subtitle Settings, and enable Export Subtitle. Choose the format for the destination:
- Burn into video: Permanently render the selected subtitle track into the picture. Viewers cannot turn it off. Check the selected language and the rendered appearance.
- As a separate file: Choose SRT under Export As and select the subtitle tracks to export. Upload the appropriate file alongside the video on platforms that accept captions. SRT does not preserve your complete Inspector styling or animation.
- As embedded captions: Use this only with a supported container and the recipient’s requested caption format. The reference manual documents options including Text and CEA-608; do not assume every codec or delivery format supports embedded captions.
For a subtitle-only file, right-click the subtitle track header and choose Export Subtitle. Play a short test render and open the sidecar in the intended player before delivering the full project. See Resolve 21’s subtitle export instructions in Chapter 59 for supported options.
Troubleshooting DaVinci Resolve Subtitle Problems
DaVinci Resolve Auto Subtitles Option Missing
Check the application name in About DaVinci Resolve: native generation requires Studio, starting with version 18.5. Open a timeline on the Edit page and look under Timeline > AI Tools; older versions may put the command directly under Timeline. If you use Free, follow the external SRT method.
DaVinci Resolve SRT Subtitles Not Showing
Confirm that the SRT has been added to a timeline subtitle track, not only imported into the Media Pool. Move the playhead inside a cue and check the timeline viewer rather than the source viewer. Enable the intended subtitle track, then inspect text size, opacity, position, and any style override. A locked track can still display captions; locking only prevents edits.
Imported SRT Subtitles Out of Sync
Check which export the SRT was generated from, including its In and Out range and leading silence. Align the first cue to the matching speech and verify later cues. Move all affected cues together for a constant offset. For drift or mismatched cuts, regenerate from the current edit. Changing the project start timecode is not a universal fix.
DaVinci Resolve Subtitles Not Exporting
Enable Export Subtitle in the Deliver settings and check the chosen output. A separate SRT does not draw text into an MP4: select Burn into video when you need visible captions everywhere. For sidecars, confirm the selected tracks and upload the SRT to the destination. For embedded captions, verify container and player support.
Chinese or Japanese Subtitles Display Incorrectly
Save or re-export the SRT as UTF-8. If characters appear as empty boxes, choose a font that includes the required Chinese or Japanese glyphs. If text appears garbled, check encoding before editing the wording. Review punctuation and language-specific line breaks; Latin-script character limits do not transfer directly to Chinese or Japanese.
Frequently Asked Questions
Is DaVinci Resolve automatic subtitle generation free?
Native speech-to-text subtitles require Studio. Resolve Free can import, edit, style, and export an externally generated SRT. The external generator may offer a limited trial or require payment for longer projects.
Does DaVinci Resolve auto captions translate speech?
The native subtitle generator transcribes speech. For another language, prepare a translated SRT, proofread it, and import it into a separate subtitle track.
Can I animate subtitles imported from Taption?
Studio 21 can analyze imported caption word timing for animated subtitles. Align the SRT to its matching audio, synchronize word timings, and preview the chosen template. The SRT itself does not contain animation, and translated text may not map word-for-word to the original speech.
Why are subtitles visible in Resolve but missing from my exported video?
Check the Deliver page’s Subtitle Settings. Choose Burn into video for permanent visible text, or provide the separate SRT to a player or platform that supports captions. Also confirm that the intended subtitle track is selected.
Can I change one caption without restyling the whole track?
Yes. Select the caption, open the Inspector’s Caption tab, and enable Customize Caption. Apply your individual styling changes there. The other captions retain the shared track style.
Which Subtitle Workflow Should You Choose?
Use Studio’s native generation when you want to stay in Resolve. Use an external SRT workflow with Resolve Free, or pair Taption with either edition when its segmentation, dictionary, and multilingual review tools suit your project. Neither workflow removes the need to proofread, verify synchronization, and check the final export. To try the external workflow on your own footage, start with Taption’s AI subtitle generator.
For related workflows, read our guides to AI subtitle generators for Premiere Pro and automatic subtitles in Final Cut Pro.
Editorial note — updated October 12, 2026: The instructions were checked against Blackmagic Design’s DaVinci Resolve 21 Reference Manual, Chapter 59 and its Resolve 21 New Features Guide. The reference manual covers general import, styling, and export steps; the New Features Guide explains version-specific additions. This guide has not been hands-on tested in Resolve 21. The Taption screenshot is an existing editor example, not a recording of a tested Taption-to-Resolve project.